Calibration and performance checks are essential to ensure the accuracy of analytical balances, a critical aspect of pharmaceutical testing and quality control. Adhering to Good Weighing Practice (GWP) not only maintains precision and consistency but also ensures compliance with regulatory standards. Calibration is an integral part of balance qualification, establishing traceability of measurement results to SI units and providing a foundation for reliable data.
Conducted by the user or a competent body, calibration results, including measurement uncertainty, are documented in a calibration certificate. To maintain this traceability, it is crucial to perform calibration before any significant maintenance operation, such as repairs, relocation, or mechanical adjustments, which could alter the balance’s performance.
This article explores how proper calibration and regular performance checks uphold the highest standards of accuracy and reliability in QC laboratory measurements, ensuring that the balance continues to deliver precise and dependable results even after significant operational changes.
What Does It Mean to Calibrate an Analytical Balance?
Calibration is a process that compares the measured values of a balance to known standards with associated measurement uncertainties under specific conditions. This comparison establishes a relationship between the balance’s indications and the true values, ensuring accurate and reliable measurement results.
Calibration of an analytical balance, along with verification (or declaration of conformity) is part of its qualification and is performed by the user, or suitable competent body. It involves comparing the balance’s performance to established reference standards.
Why Is Calibration Essential for Analytical Balances?
Analytical balance calibration is critical to ensuring the precision and dependability of measurements in pharmaceutical testing and quality control, as well as the balance’s capacity to produce accurate findings when weighing samples. By calibrating analytical balances, laboratories can minimize errors and enhance overall confidence in the analytical results obtained.
RELATED: Analytical Balances in QC Labs
This process verifies that the balance consistently delivers results within acceptable limits, as specified by USP and Ph. Eur guidelines.
Reliability of Results
Regular calibration of analytical balances ensures that measurements are consistent and trustworthy over time. This reliability is crucial for maintaining compliance with stringent regulatory standards.
RELATED: GMP Regulatory Bodies
By adhering to a stringent calibration schedule, laboratories can detect and correct any deviations or drifts in the balance’s performance. This proactive approach helps prevent inaccurate measurements that could lead to flawed data, compromised product quality, or non-compliance issues. Ultimately, the consistent reliability of analytical balances enhances the credibility of the laboratory’s findings and supports the overall integrity of the scientific process.
Detection of Aging and Drift
Regular calibration detects and corrects deviations caused by aging and environmental factors. Aging and drift are phenomena that affect the performance of analytical balances, leading to changes in accuracy and precision over time.
Aging refers to the gradual degradation of the balance’s components due to prolonged use and environmental exposure. This can include mechanical wear and tear, as well as the impact of temperature and humidity fluctuations on sensitive parts. As components age, their ability to maintain precise measurements can diminish.
Drift, on the other hand, is the gradual change in measurement readings over time, which can introduce systematic errors into results. Factors contributing to drift include temperature changes, vibrations, electrostatic and magnetic interferences, and air currents in the laboratory. Even minor fluctuations can accumulate, leading to significant deviations from true measurements.
Factors Contributing to the Aging Process
- Mechanical Wear and Tear:
Components within the balance, such as the weighing mechanism and moving parts, may experience wear and tear with prolonged use. The mechanical characteristics of the balance may alter as a result, impairing its functionality.
- Environmental conditions:
Exposure to extreme temperatures or fluctuations in humidity levels may accelerate the degradation of sensitive components, leading to changes in performance
- Usage:
The frequency and intensity of use can also impact the aging process. Balances used frequently or subjected to heavy loads may experience accelerated wear and degradation compared to those used infrequently or for lighter tasks.
Factors Affecting Drift
- fluctuations in temperature, including changes caused by direct sunlight;
- ambient humidity (optimum relative humidity (RH%) during weighing should be between 40 – 60 % RH);
- barometric pressure;
- electrostatic forces;
- magnetic forces;
- air currents present in the laboratory and vibrations due to laboratory operations;
- sample handling techniques;
- dust;
- general maintenance of the balance;
Regular calibration, maintenance, and environmental control are essential for minimizing the effects of aging and drift. Calibration helps identify and correct any deviations in the balance’s performance, while routine maintenance tasks, such as cleaning and lubrication, can prolong the balance’s lifespan and maintain its accuracy.
Types of Calibration for Analytical Balances

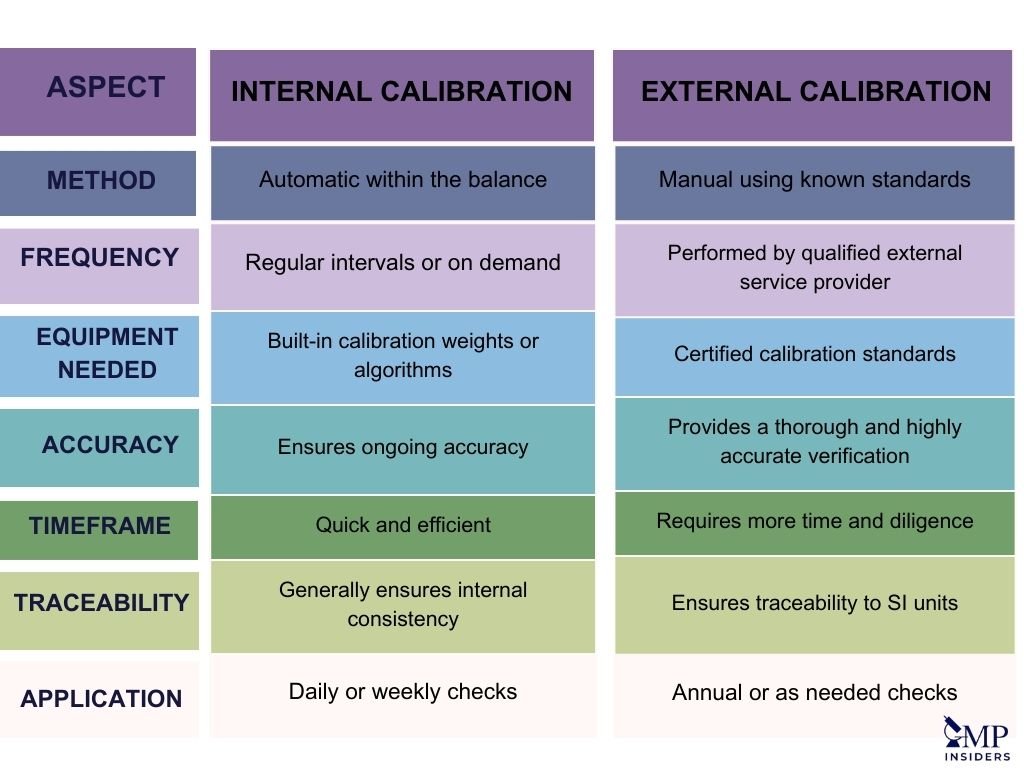
The two main methods for calibrating analytical balances are internal and external calibration. Each method has its advantages and specific applications, depending on the needs of the laboratory and the level of precision required. Internal calibration is often favored for its convenience and efficiency, while external calibration provides a thorough and highly accurate verification of the balance’s performance. Understanding the differences between these two methods can help laboratories choose the best approach for their calibration needs.
Internal Calibration
The term “internal” calibration can be confusing in some cases because it refers to the automated calibration of the balance using built-in weights, while in others it refers to the periodic (daily/weekly/monthly) performance checks as a regulatory requirement (Ph. Eur.) and an internal rule defined by the laboratories.
To better differentiate these two activities, we are using the following terms:
Automated internal calibration is a method used in calibration, where the balance performs calibration automatically within its own system. This process typically involves built-in calibration weights or algorithms that allow the balance to calibrate itself at regular intervals or on demand.
This approach offers convenience and efficiency, reducing the frequency of sensitivity checks using external reference weights. This method ensures that the instrument remains calibrated at regular intervals or upon user initiation, thereby optimizing measurement accuracy and reliability.
Daily testing with an external reference weight is not required for electronic balances with built-in weights. However, a test with external weights should be performed periodically to detect any potential problems with the built-in weights.
Lab-defined internal calibration is performed by lab personnel within laboratories using external reference weights. This calibration is a regular occurrence in many laboratories that perform repeatability and sensitivity tests (performance checks) in between external calibrations.
Internal calibration is used:
- When conditions fluctuate (variations in temperature, humidity, motion)
- To conduct periodic performance checks
- After a reset of the balance’s electric signal
External Calibration
Unlike internal calibration, external calibration is a manual method that refers to the process of verifying and adjusting the accuracy of analytical balances, by comparing their measurements to those of a known standard. This process is performed by a qualified external calibration service provider or according to Ph. Eur using certified calibration standards that comply with either OIML R-111 or ASTM E-617 standards. These weights should cover the range of masses typically used in pharmaceutical testing procedures.
External calibration requires the maintenance of balances and weights, as well as the establishment of optimal settings. Although the process is uncomplicated and rapid, it demands diligence in order to uphold ideal calibration.
RELATED: Calibration, maitenance and handling of pH meters in QC-labs
Calibration Frequency of Analytical Balances
The frequency of calibrating analytical balances is a critical aspect of maintaining measurement accuracy and reliability. The exact frequency should be determined through a risk-based assessment and documented criteria supported by scientific reasoning.
Factors influencing calibration intervals include the required measurement uncertainty, risk of exceeding permissible error limits, usage extent and frequency, and the balance’s tendency to wear and drift over time. Manufacturer recommendations, environmental conditions such as climate and vibrations, historical calibration data, maintenance records, and the training level of personnel also play crucial roles.
Internal calibration, often performed daily, ensures the balance’s accuracy before any measurements. It is particularly necessary before critical measurements, after significant changes like moving or repairing the balance, and when environmental factors such as temperature fluctuations or air drafts could affect accuracy.
External calibration, often conducted by certified external companies, is typically performed annually to ensure adherence to regulatory standards. This annual activity helps to identify and rectify any deviations or drifts that may have occurred over the year while providing an unbiased verification of the balance’s accuracy, reinforcing confidence in the measurement results.
Each QC laboratory is responsible for designing its Quality Management System (QMS) to suit its specific needs, including determining the frequency of both external and internal calibrations based on the balance’s usage and other relevant factors. This tailored approach ensures that analytical balances consistently deliver precise and reliable results.
Reference Weights
Reference weights should cover a range from the lowest to the highest weight that the balance is capable of measuring accurately. It’s recommended to incorporate various weights within this range to assess the balance’s performance across different measurement levels.
The selection of reference weights for calibration and sensitivity tests is based on the criteria that these weights must comply with either OIML R-111 or ASTM E-617 standards, ensuring metrological traceability.
Additionally, for repeatability tests, other weights can be used provided their mass remains stable throughout the testing process. This allows for flexibility while still maintaining the accuracy and reliability of the balance assessments.
General Steps on How to Properly Calibrate Your Analytical Balance

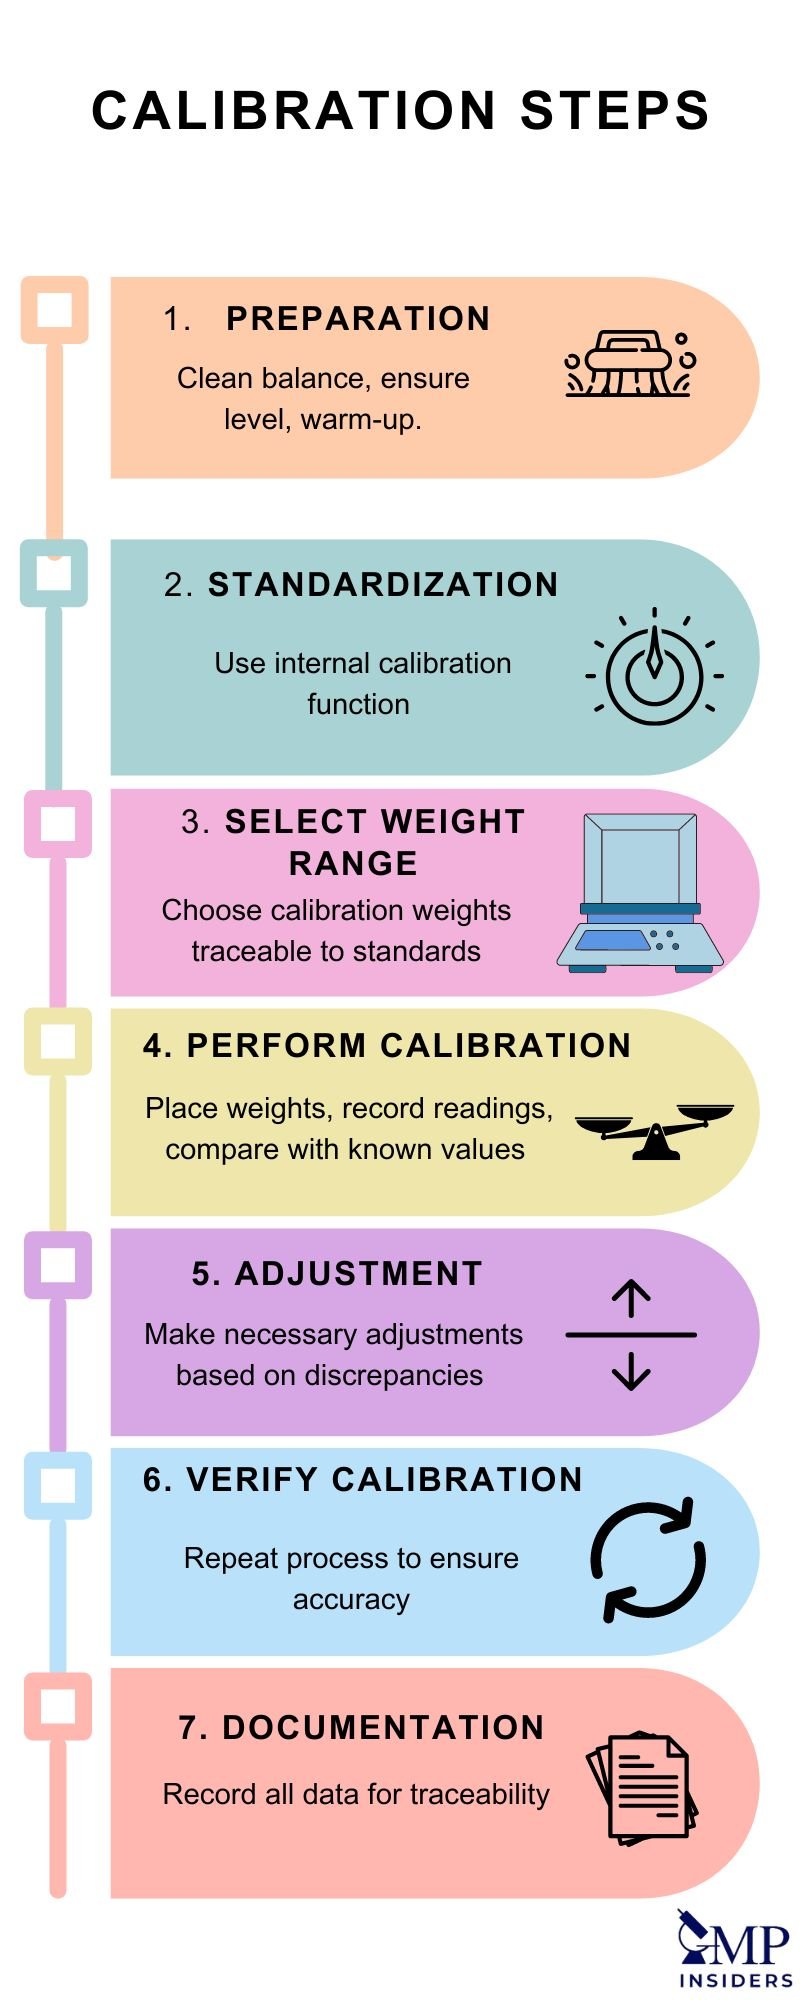
Proper calibration of analytical balances involves several critical steps to ensure accuracy and reliability in measurements. By following a systematic approach to calibration, laboratories can maintain high standards of precision and compliance with regulatory requirements. Below are the general steps involved in calibrating an analytical balance:
1. Preparation
Before starting the calibration process, ensure the analytical balance is clean and free from any debris or residue. Check that the balance is level, as an unlevel balance can affect measurement accuracy. Allow the balance to warm up according to manufacturer instructions, ensuring it reaches stable operating conditions.
2. Standardization
Standardize the balance using its internal calibration or auto-calibration function, if available. This step ensures the balance is functioning properly before calibration and helps establish a stable reference point for measurements.
3. Select Weight Range
Choose calibration weights that cover the range of measurements typically used with the balance. These weights should be of a known mass and traceable to a national or international standard.
4. Perform External Calibration
Place the chosen calibration weight on the balance pan. Record the displayed weight readings on the balance and compare the displayed readings to the known masses of the calibration weights. Note any discrepancies between the displayed readings and the expected values. The weight should be placed in the center of the pan to eliminate corner-weighing differences (unless it is a test for eccentricity).
Every standard weight must:
- have a distinct identification.
- be clean and, if needed, wiped following the instructions in the manual or the recommendations in OIML R 111-1.
- be handled carefully, using forceps or tweezers for smaller weights and cotton gloves for larger weights. They should not be touched with bare hands.
5. Adjustment (If Necessary)
Balance adjustments may be necessary if significant discrepancies are observed between the displayed readings and the expected values. Follow manufacturer instructions or established procedures to make any required adjustments to the balance settings.
6. Verify Calibration
After adjustments, repeat the calibration process to ensure the balance now displays accurate readings consistent with the known masses of the calibration weights.
Verify that the readings are within acceptable tolerance limits.
7. Documentation
Record all calibration data, including the weights used, displayed readings, any adjustments made, and the final calibration results. A good documentation practice is essential for maintaining a record of the balance’s calibration history and ensuring traceability.
Performance Checks for Analytical Balances

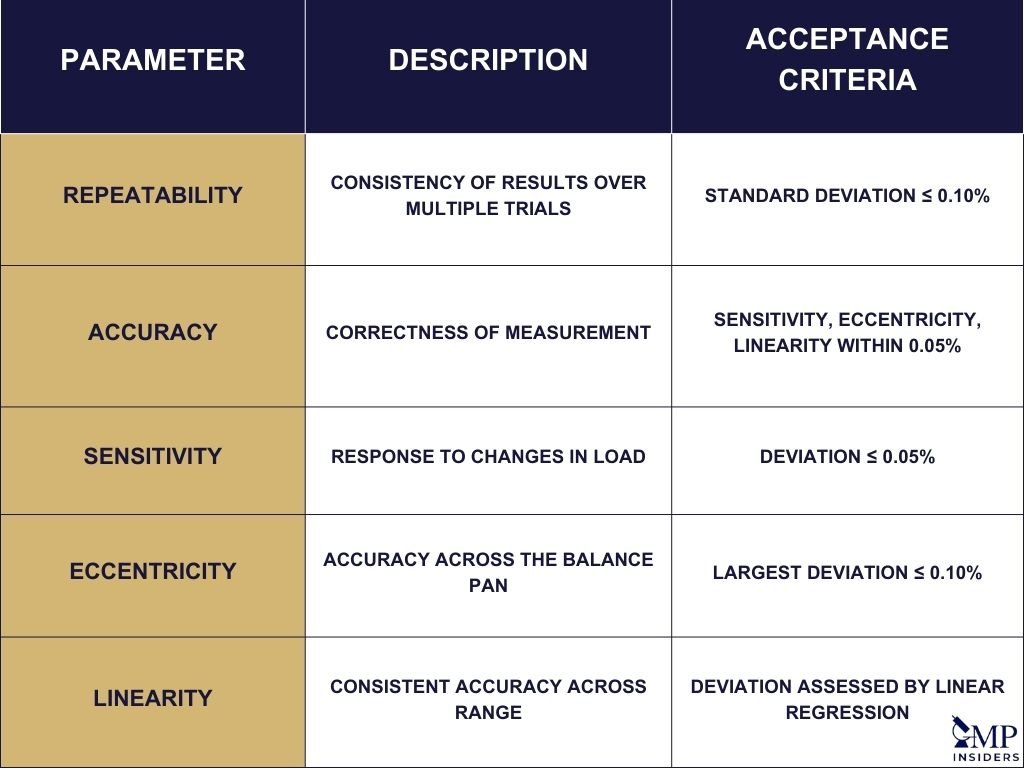
Performance checks must be carried out between calibrations. They are used to evaluate the random and systematic error of a balance. With a performance check, we determine the precision (through repeatability) and accuracy (through sensitivity) of the balance and compare the results obtained to pre-defined acceptance criteria. Balances are considered suitable if none of these errors exceeds 0.10%. Each laboratory should define the frequency of conducting these checks.
The two key weighting parameters that have the most notable impact on the performance of the analytical balance are repeatability and accuracy.
Accuracy (Error of Indication)
Accuracy is impacted by sensitivity, eccentricity, and linearity. These factors are independent of each other and are unlikely to occur at the same time. When conducting an accuracy performance check, evaluating sensitivity alone (at 0.05%) is adequate, as the influence on eccentricity and linearity is generally lesser compared to sensitivity. Therefore, the acceptance criteria for this parameter can be established at 0.05%, which is half of the overall accuracy acceptance criterion of 0.10%.
Sensitivity
The sensitivity of an analytical balance significantly impacts its accuracy. As the load on the balance increases, sensitivity deviation tends to rise linearly. Consequently, assessing sensitivity becomes more crucial for loads in the upper weighing range of the balance. Testing sensitivity in the lower weighing range of the balance is considered not meaningful.
It is best if sensitivity is evaluated using a single test load, with a reference weight ranging from 5 – 100% of the balance’s capacity.
According to Ph. Eur., the test is successful if:
\[ \frac{|i - m|}{m} \times 100 \leq 0.05 \]
where:
i = measured value (Indication)
m = the reference value of the mass of the weight used (nominal value or conventional value).
In general, it is accepted to use the nominal weight as the test load value for this calculation, as long as the relative maximum permissible error of the test load (maximum permissible error of the test load divided by the nominal weight) does not exceed one-third of the sensitivity test specification value (0.05%). Otherwise, the conventional mass value of the test load (written in the calibration certificate) should be used for the evaluation. Here, the user must guarantee that the weight uncertainty divided by the nominal weight is lower than one-third of 0.05%.
The following paragraphs briefly describe eccentricity and linearity. However, as previously noted, these two parameters have significantly less impact on accuracy, compared to sensitivity, hence they are not required to be included in periodic performance checks between external calibrations.
Eccentricity
The test is performed by reading the values of weighing the weight at approximately 1/3 of the maximum capacity of the balance or the maximum operational range defined by the laboratory. The balance pan is segmented into quadrants or distinct sections when conducting the eccentricity test.
Within each section, starting from the center and then progressing outwards, a single test weight is carefully positioned, ensuring it’s precisely centered. The values of the weight located in the center and off-center positions are recorded.
This ensures that the balance provides accurate measurements regardless of where the sample is placed on the pan and it helps identify any asymmetry or irregularities in the balance’s weighing mechanism, ensuring reliable and consistent results.
The eccentricity error (Ee) is calculated as:
- the largest deviation between an off-center and the center readings or
- the largest deviation between the nominal value of the weight and the reading values at different positions
Linearity
Linearity assesses the balance’s ability to maintain consistent accuracy across its entire weighing range. A high level of linearity ensures that the balance provides reliable and proportional measurements regardless of the weight being assessed, thus enhancing the precision and reliability of analytical results.
The selection of test weights is crucial for the assessment of the balance’s linearity and it should cover the entire capacity of the balance, including values at the low, middle, and high ends of the weighing range. Linearity is performed by gradually increasing the weights, starting from the lowest value. Every test weight is carefully placed on the balance pan, and the indication reading is recorded. The process is repeated with the next weight that is higher in the specified sequence. To calculate the linearity, linear regression analysis is typically used.
Repeatability
Typically, the weight of the substance being measured using the analytical balance is lower than the balance’s maximum capacity. When measuring small quantities, random error is considered a major contributor to measurement uncertainty.
The random error can be determined by calculating the standard deviation obtained from the measurements of a single weight, preferably in the lower operating range of the balance (not more than 5% of the maximum capacity of the balance).
Small weights are quite difficult to operate with. If the repeatability test requires a weight smaller than 100mg, then a 100mg weight should be used.
The balance should be zeroed before placing the weight on the weighing pan. This procedure (including the zeroing) should be performed at least 10 times.
According to Ph. Eur, the repeatability test is successful if:
$\frac{2xs}{m(snw)} \times 100 \leq 0.10$
where:
s = standard deviation of the indicated values
m(snw)= smallest net weight (defined by the user)
if s < 0.41 × d, where d is the readability (scale interval) of the balance, s should be replaced with 0.41 × d
Minimum Weight
The minimum weight (mmin) of an analytical balance is established through the results of the repeatability test. This value represents the smallest net sample mass that can be accurately measured while still meeting the repeatability test criteria. It ensures that even the smallest measurements adhere to strict precision standards.
The minimum weight is calculated using a specific equation, allowing laboratories to identify the threshold at which their balance can reliably operate without compromising accuracy.
mmin = 2000 × s
if s < 0.41 × d, s should be replaced with 0.41 × d
FAQ
How Often Should Analytical Balances in a QC Lab Be Calibrated?
The frequency of calibration depends on factors such as usage intensity, environmental conditions, and manufacturer recommendations. Typically, internal calibrations should be performed daily or before critical measurements, while external calibrations are usually conducted annually by certified providers. However, each lab should determine the frequency based on a risk-based assessment and documented criteria.
What Should Be Done if Significant Drift Is Noticed in Balance Measurements?
If significant drift is detected, perform a full calibration to verify the balance’s accuracy. If the drift persists, check for environmental factors such as temperature changes, vibrations, and air currents. Additionally, inspect the balance for any mechanical issues or wear and consider professional maintenance or repair services if necessary.
What Kind of Weights Should Be Used for Calibration?
Calibration weights should comply with either OIML R-111 or ASTM E-617 standards to ensure metrological traceability. Using certified weights ensures the accuracy and reliability of the calibration process. Non-certified weights may introduce errors and compromise measurement integrity.
What Should Be Done if a Balance Fails a Performance Check?
If a balance fails a performance check, first verify that the calibration weights and procedures were correct. If the failure persists, recalibrate the balance and check for any potential issues such as mechanical wear or environmental disturbances. If necessary, consult the manufacturer or a professional service provider for further assistance.
Conclusion
Calibration and performance checks of analytical balances are fundamental to maintaining the accuracy and reliability of measurements in pharmaceutical testing and quality control. By adhering to Good Weighing Practice (GWP), laboratories ensure that their balances deliver precise and consistent results, meeting stringent regulatory standards.
Regular calibrations, along with diligent performance checks, help detect and correct deviations caused by factors like aging and environmental conditions. This proactive approach not only enhances measurement accuracy but also supports the integrity of the scientific process, ensuring the highest standards of product quality and compliance. By implementing these practices, laboratories can confidently rely on their analytical balances to provide dependable data essential for critical decision-making in the pharmaceutical industry.


